5D Visitor Management – View Visits
The following guide will show you how to navigate and use the 5D Visitor Management Section.
To access the “View Visits” page click on the “Visitor Management” tab on the left of the screen and then click on “View Visits”
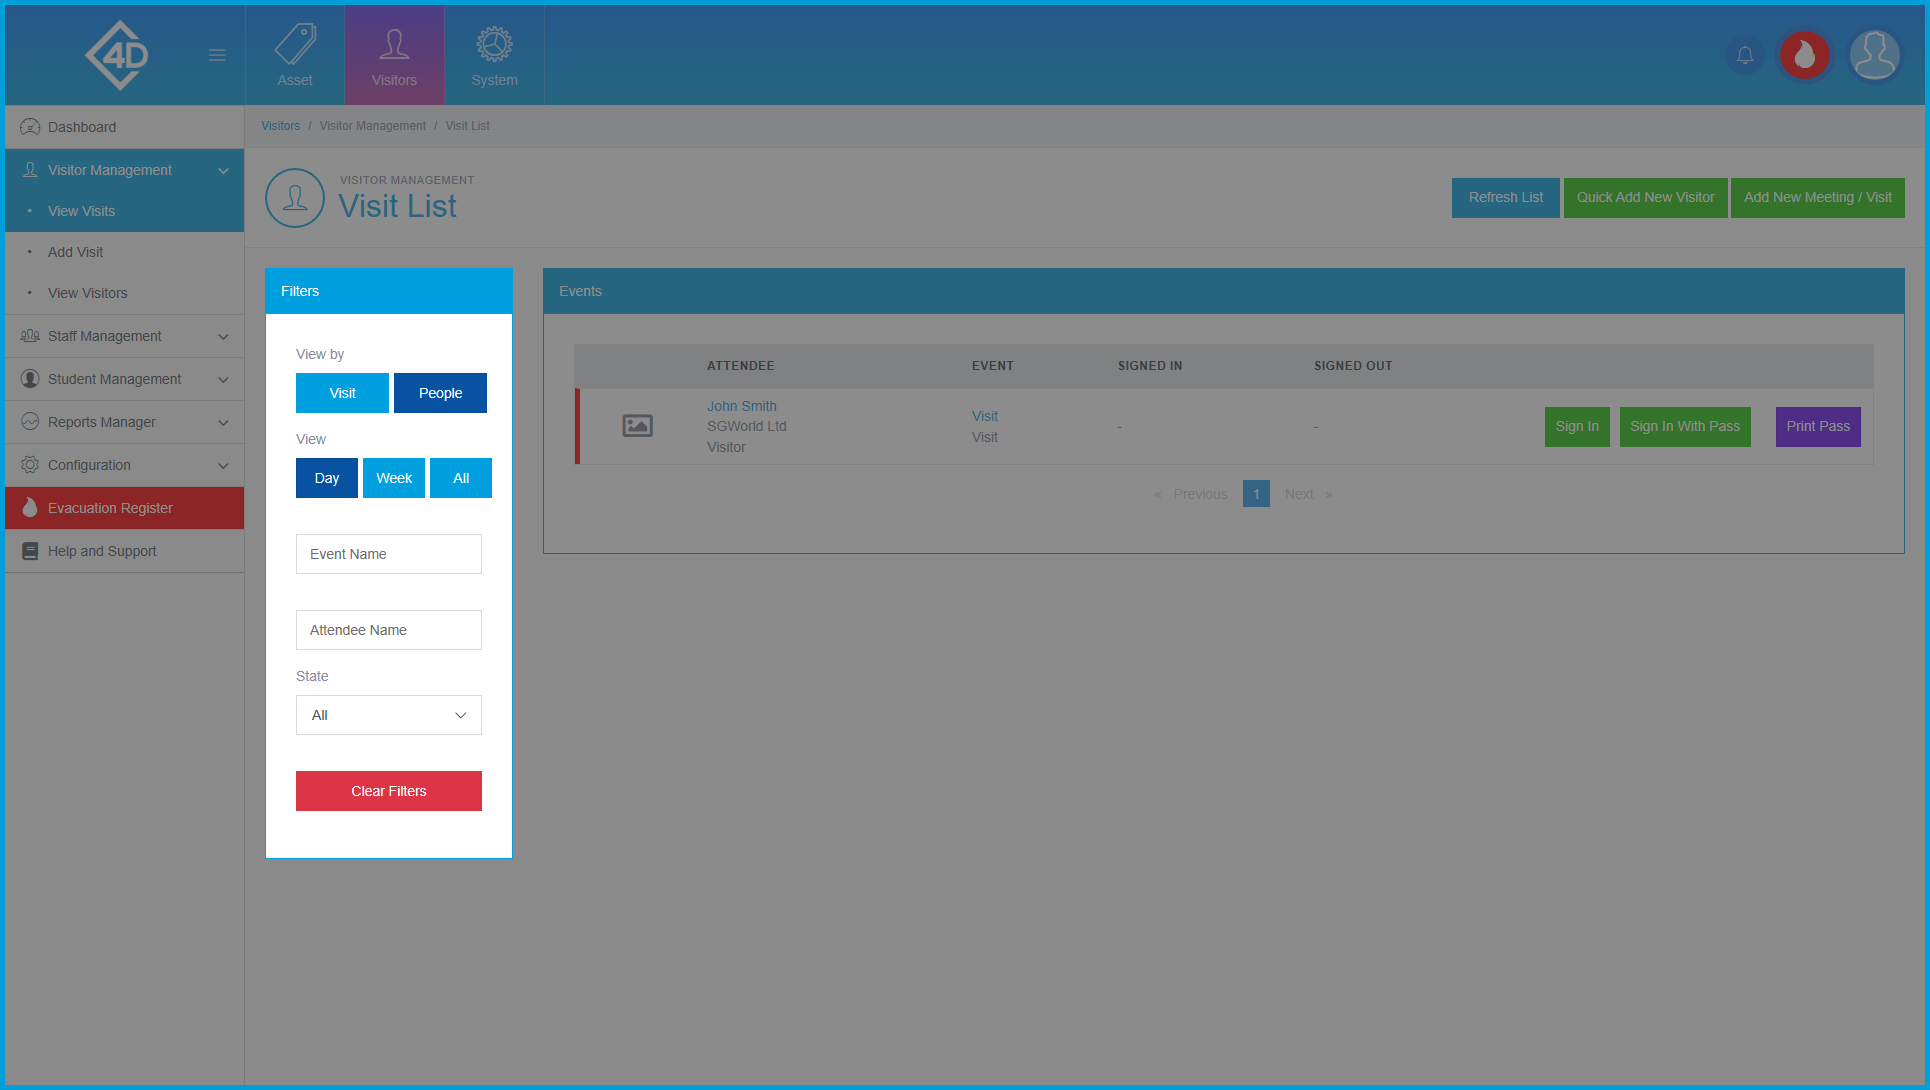
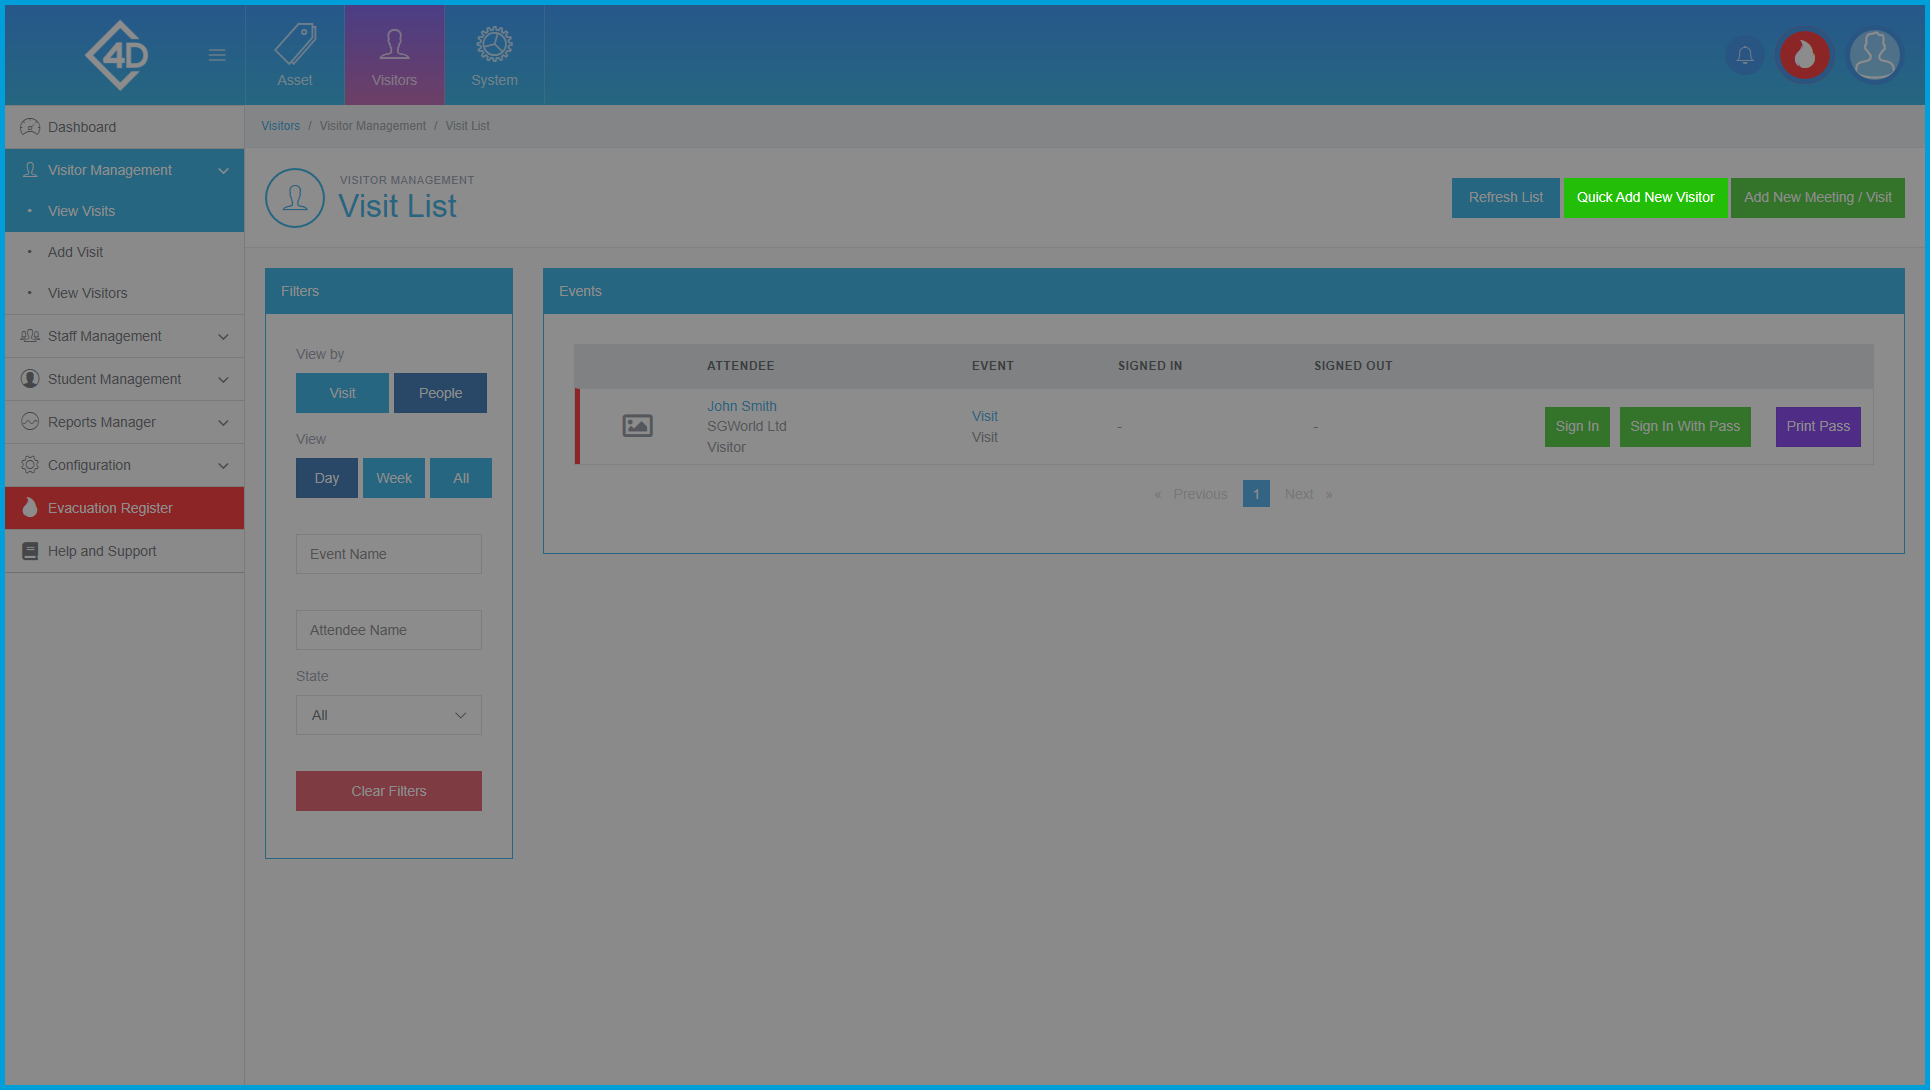
The “View Visits” page will then open and will look like the image below.
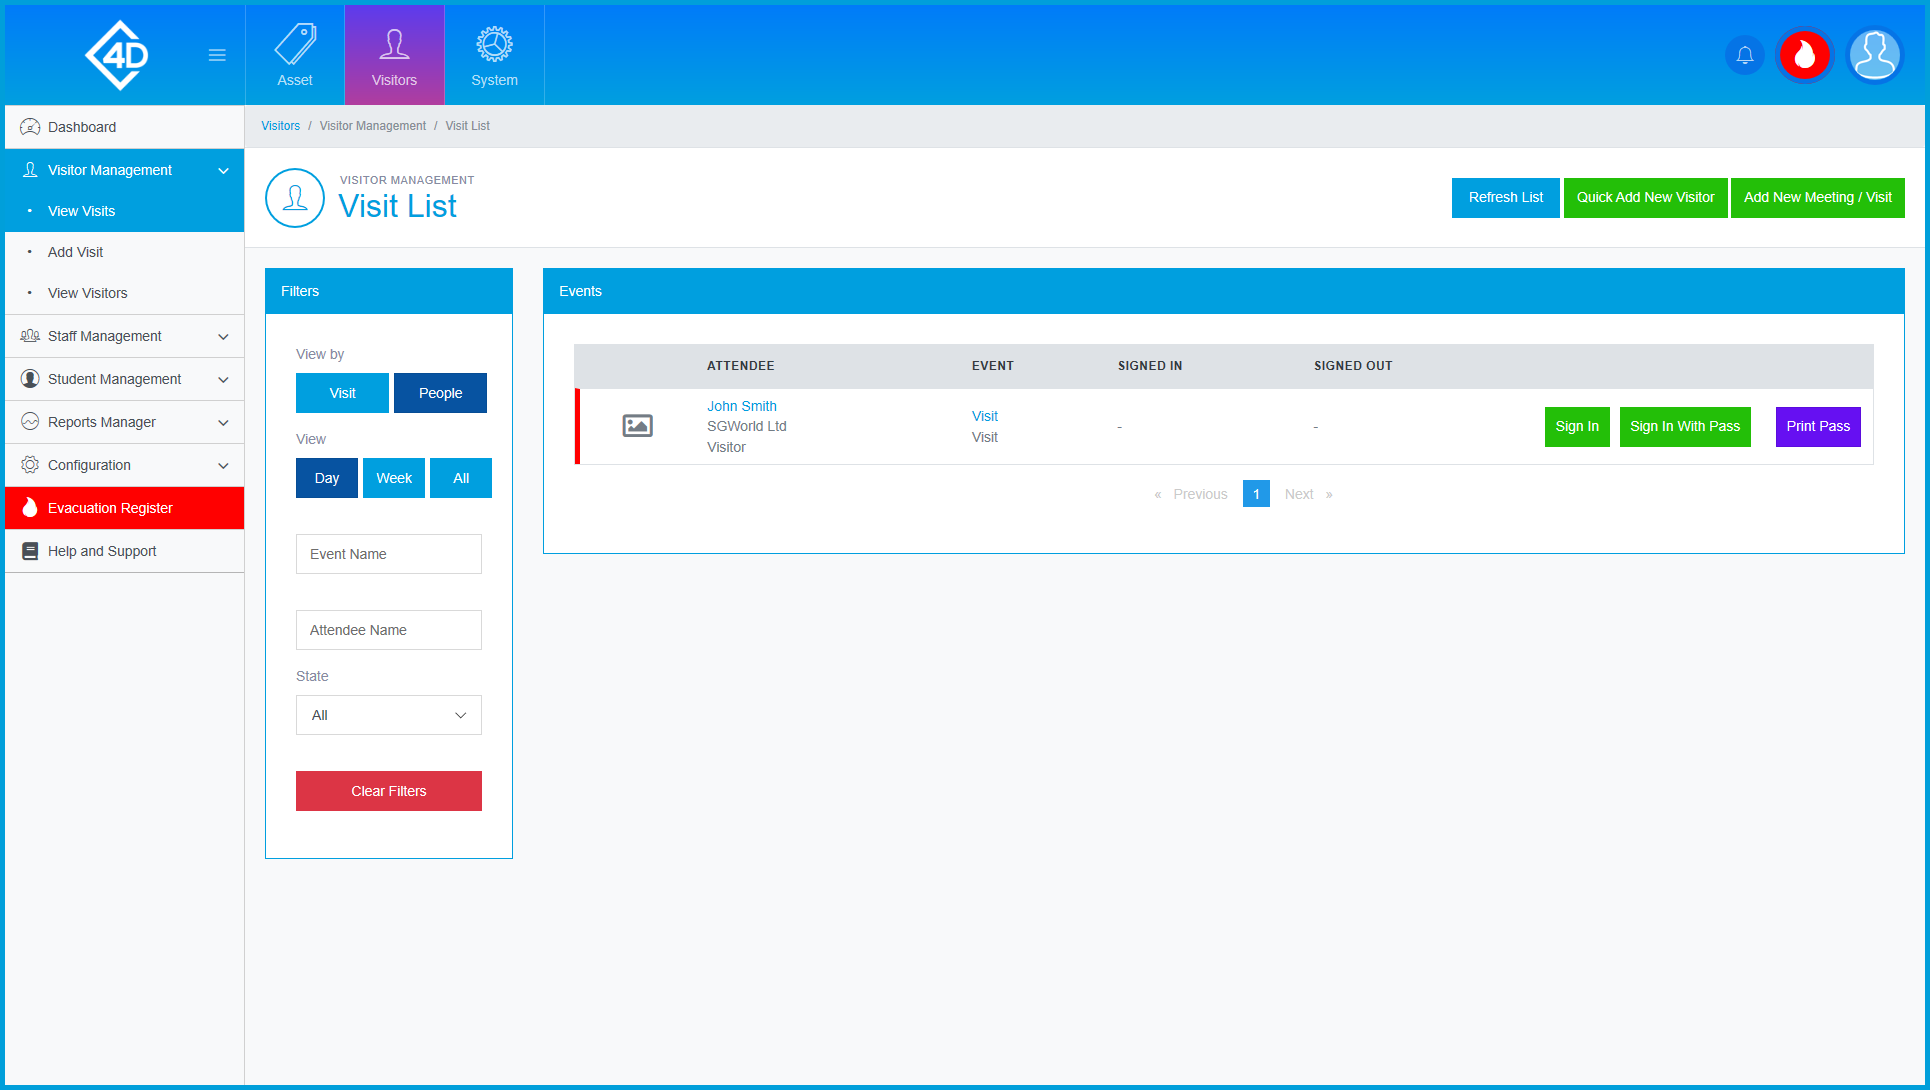
The “Events” table shows a list of the “Visits” that are currently active on your system.
Listed are the “Attendees”, the “Event” name, and whether the “Attendee” is signed in or out. (The signed in/out fields will be populated with a date and time)
The “Sign In” button will sign the attendee in without printing a pass.
The “Sign In with Pass” button will sign the attendee in and print a pass.
The “Print Pass” button will print a pass for the attendee, but will not sign them in/out.
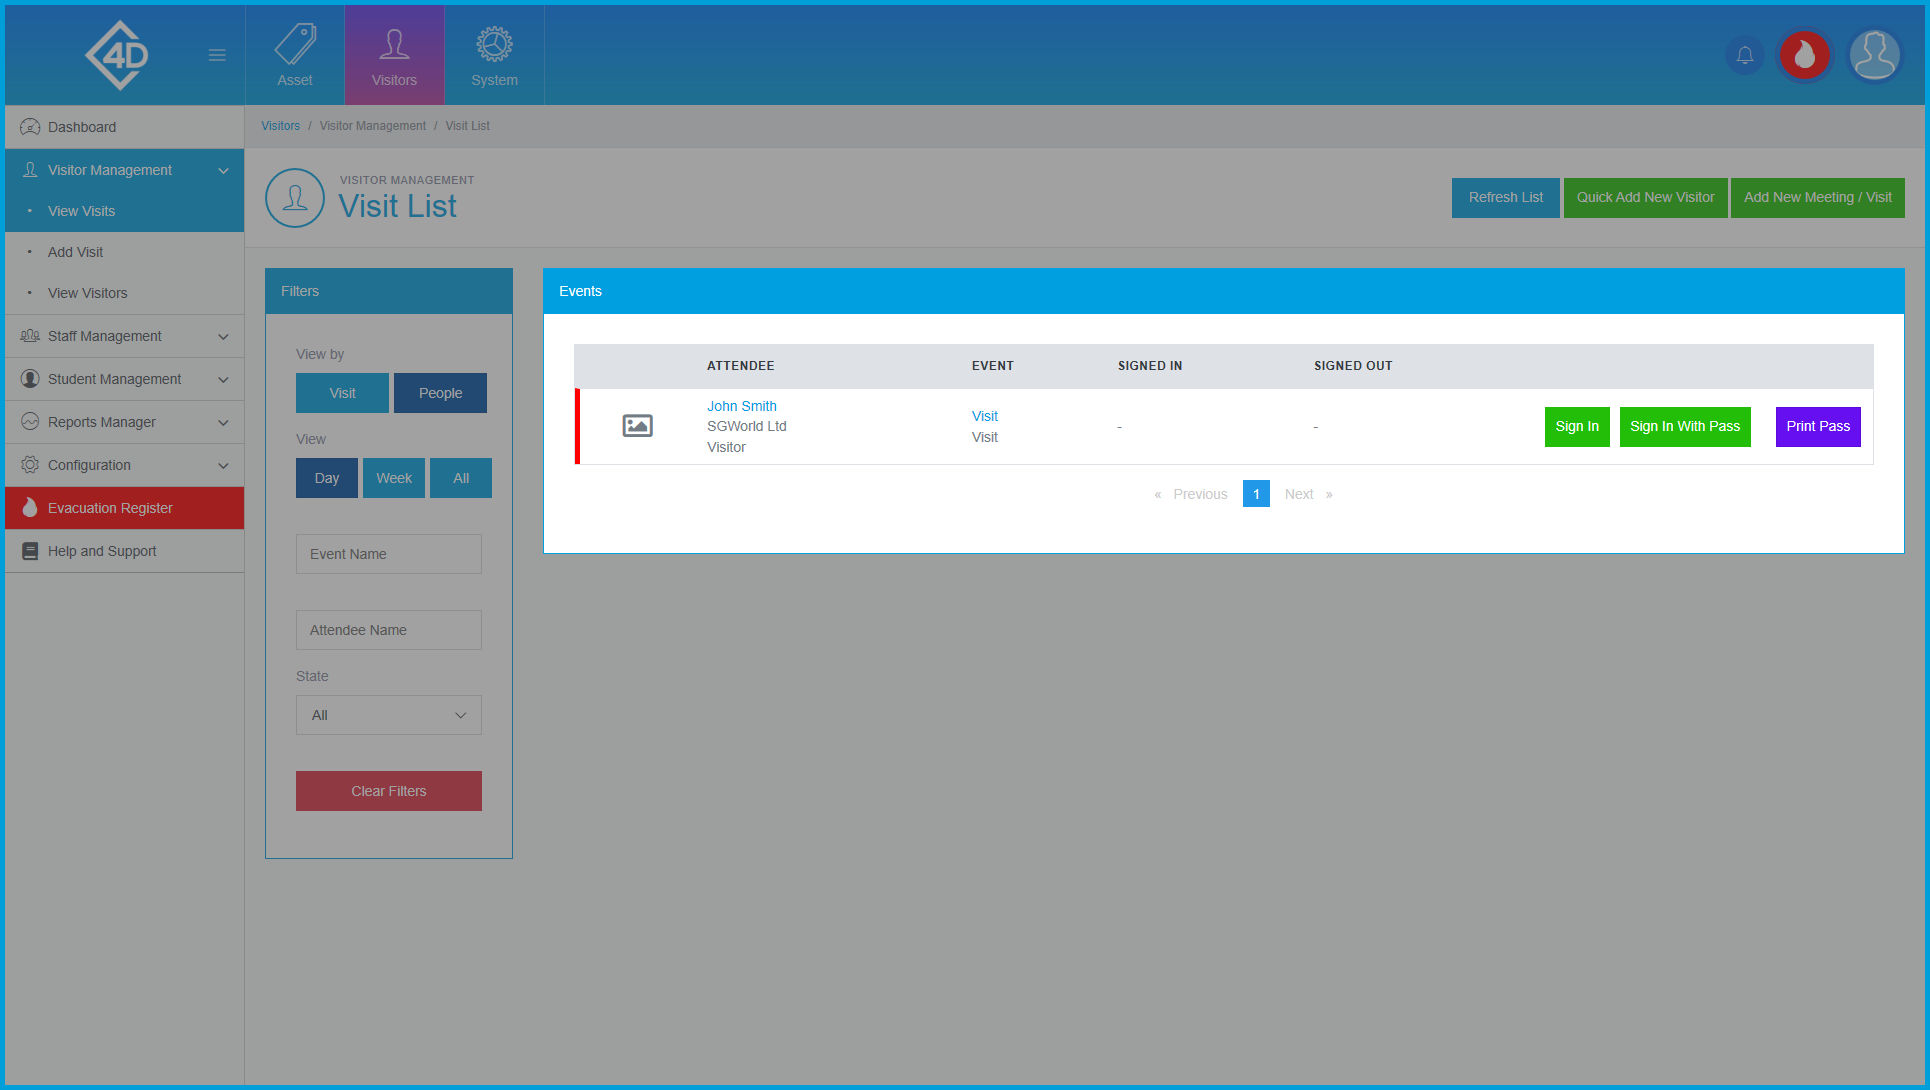
On the left of the page is the “Filters” list, the features are as follows:
- Visit – If you would like to filter by the “Visit” click this button.
- People – If you would like to sort by the “Attendee” click this button.
- View – Choose between “Day”, “Week” or “All”, this will filter out Visits that are not relevant.
- Event Name – If you know the name of the Visit that you are looking for, fill in this field.
- Attendee Name – If you know the name of the Attendee that you are looking for, fill in this field.
- State – You can filter between “All”, “Signed In” and “Signed Out”.
The “Clear Filters” button will wipe both fields and display the default view.
Add Visitor
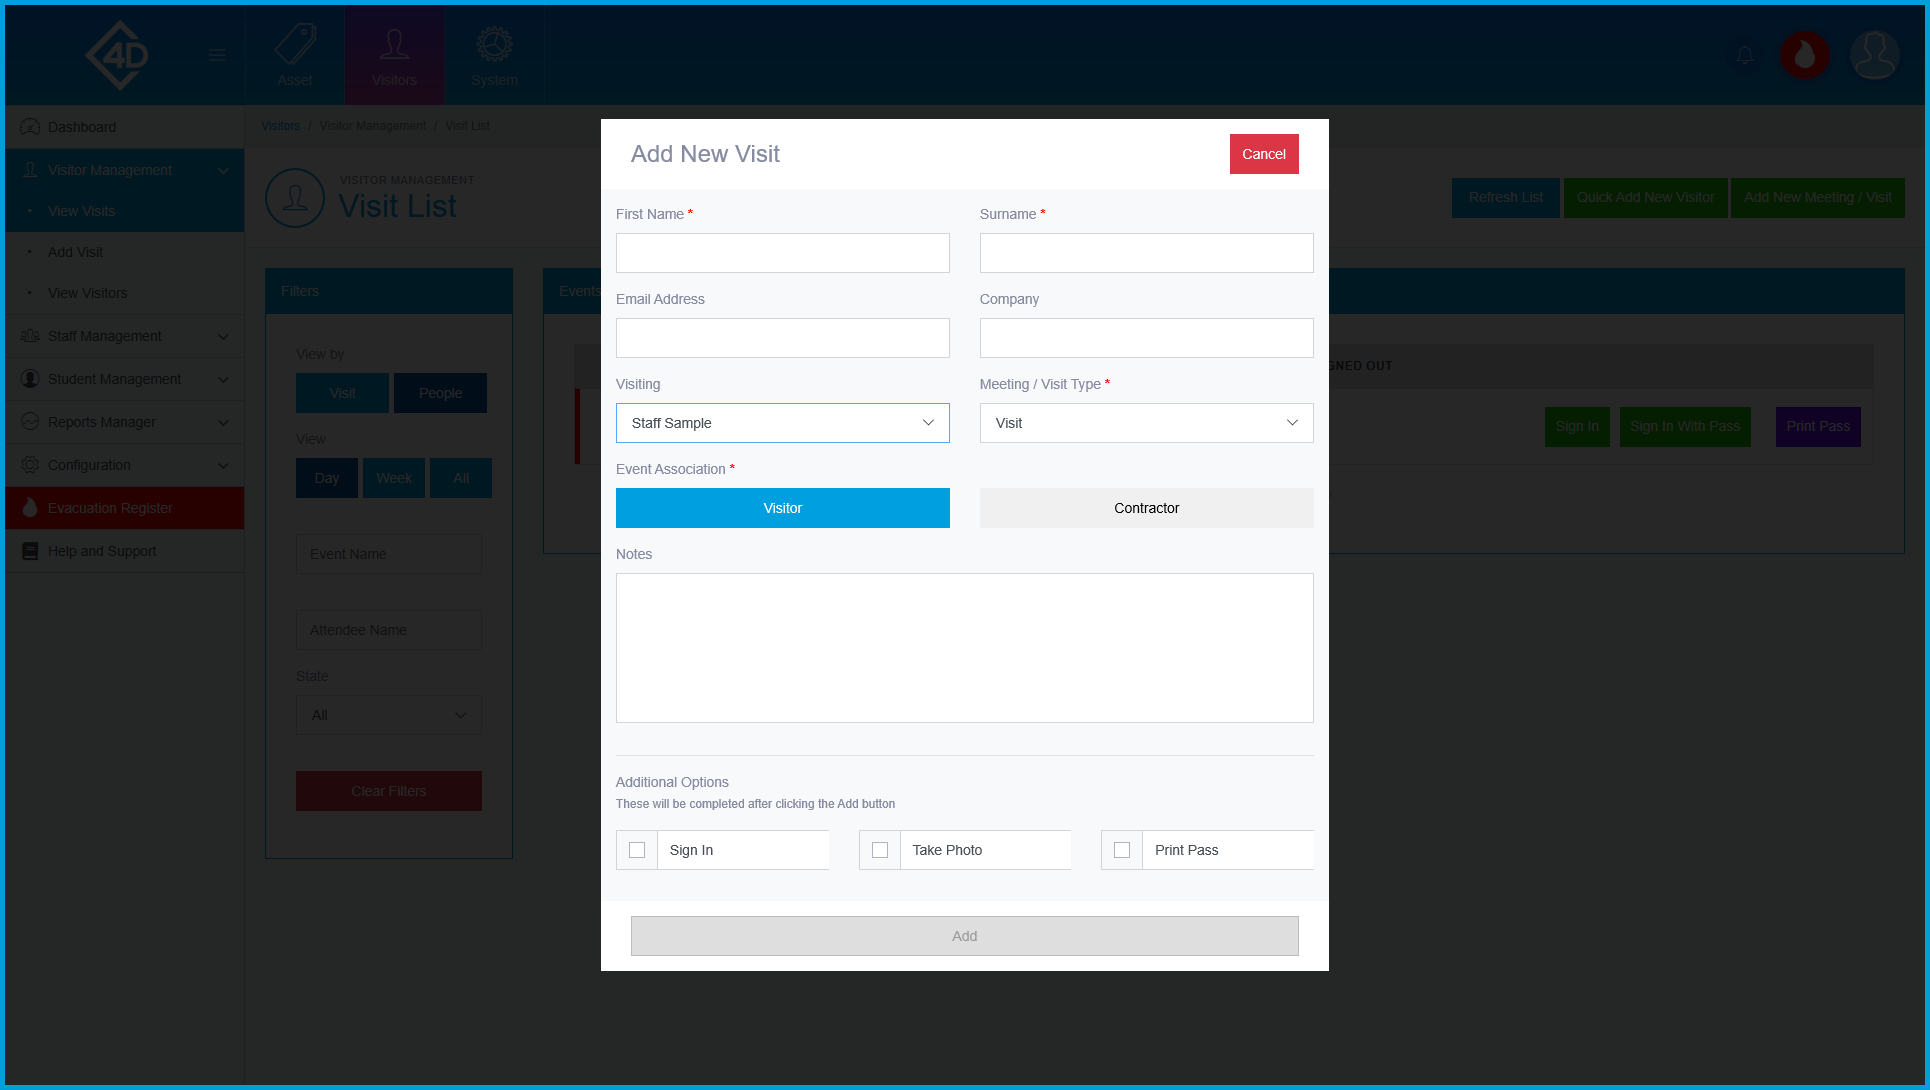
If you would like to add a new visitor, click the green “Quick Add New Visitor” button in the top-right of the screen.
The “Add New Visit” box will then open, you can fill out the following fields:
- First Name – Allows you to state the name of the Visitor.
- Surname – Allows you to state the name of the Visitor.
- Email Address – If the visitor has an email address which they would like to be added to the system, you can add it here.
- Company – Allows you to state the company that the Visitor is acting on behalf of.
- Visiting – This dropdown box allows you to pick the relevant Staff Member.
- Meeting / Visit Type – This dropdown box allows you to pick the meeting / visit type from a list of existing types.
- Event Association – Choose between “Visitor” and “Contractor” to allocate the visitor a type.
- Notes – If you would like to add any notes to the Visitor’s record, do so here.
Additional Options:
- Sign In – Tick this box if you would like to sign the Visitor in once you have created their record.
- Take Photo – If you have a camera linked, and would like to take a photo of the Visitor, tick this box.
- Print Pass – Tick this box if you would like to print the Visitor a pass once you have created their record.
Once you are happy with your new Visitor record, click the “Add” button at the bottom of the box.
If you would like to stop creating a record without saving, click the red “Cancel” button in the top-right of the box.
Add Meeting / Visit
If you would like to add a new meeting/ visit, click the green “Add New Meeting / Visit” button in the top-right of the screen.
The “Add Visit” page will then open, for more information on how to use this page, please follow the “4D Visitor – Section Two – Visitor Management – View Visits” guide.
Viewing a Visitor Record
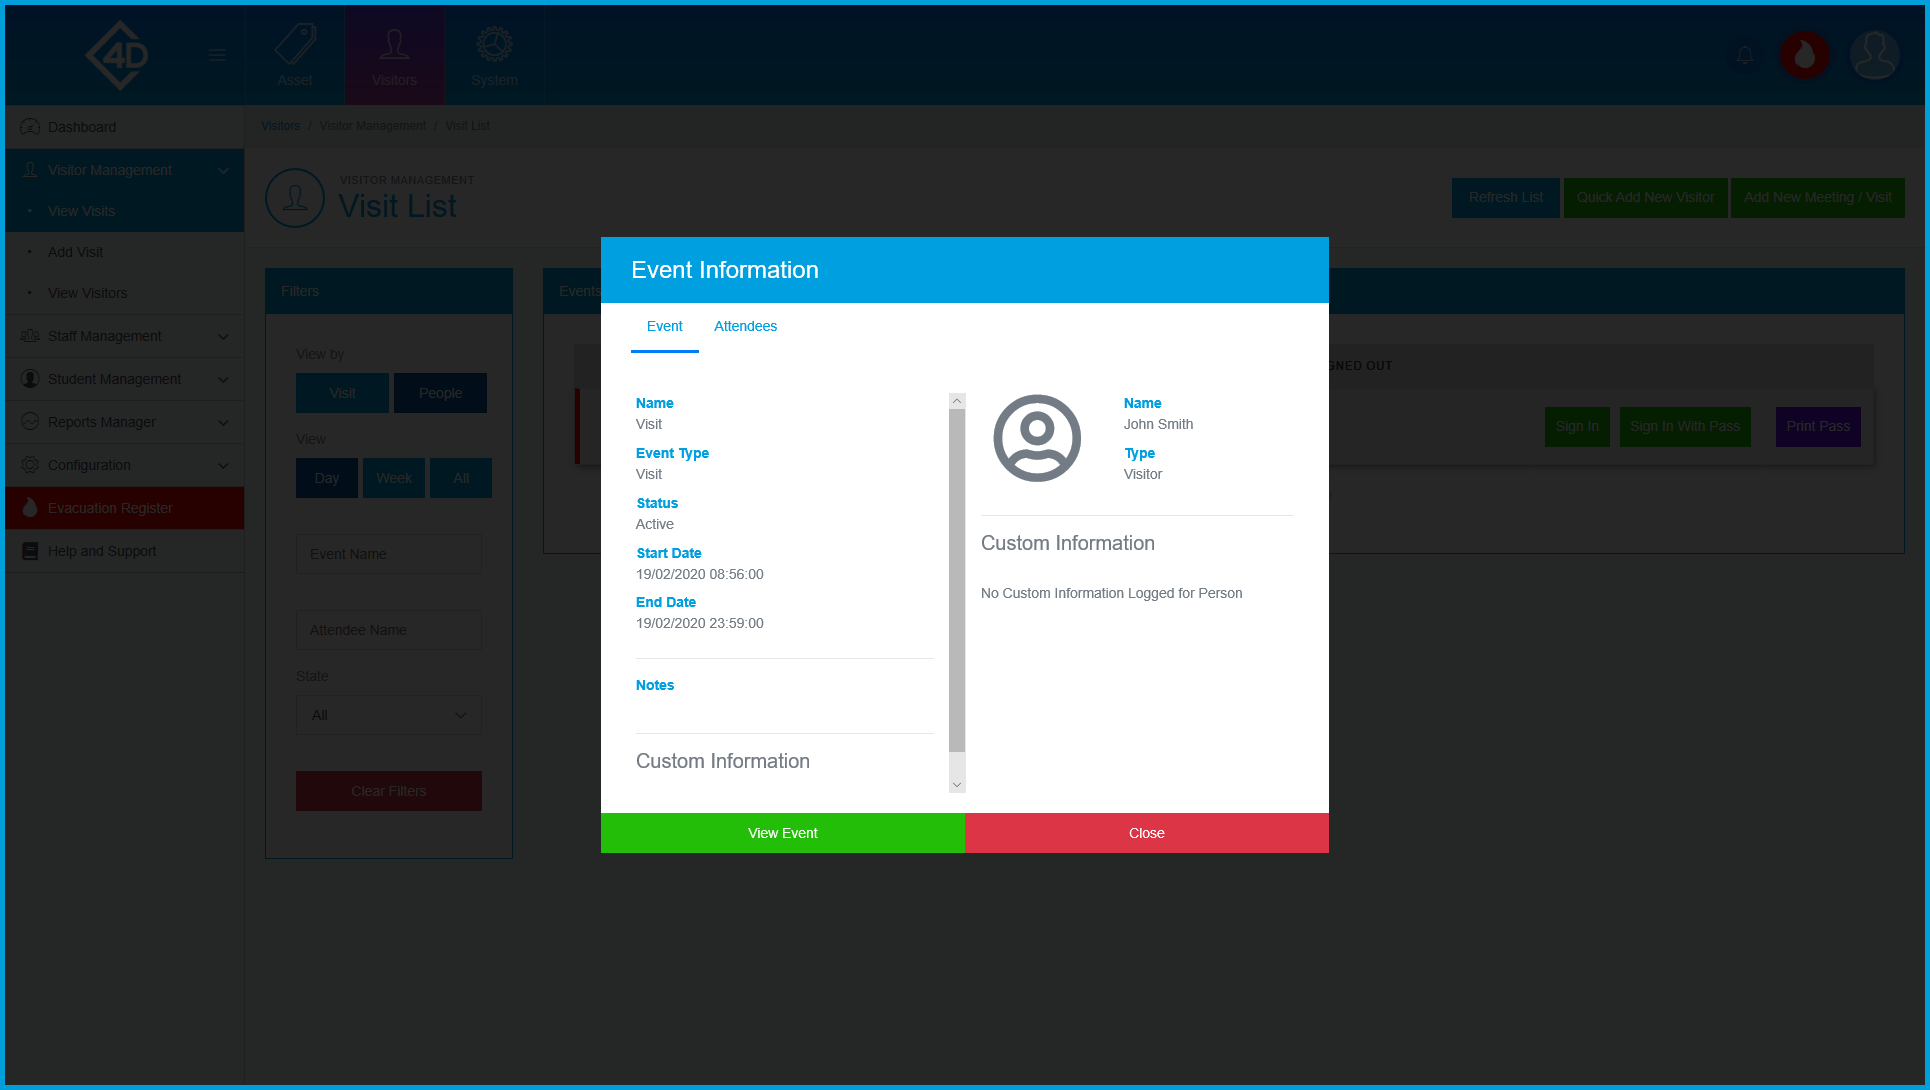
To access a Visitor’s record simply click on their name in the “Attendee” column, the "Event Information" box should then appear.
The "Event Information" box gives you a quick breakdown of the Visitor's personal information and a quick view of the event details and attendees.
For a more in-depth view, click the green "View Event" button.
Viewing a Meeting / Visit
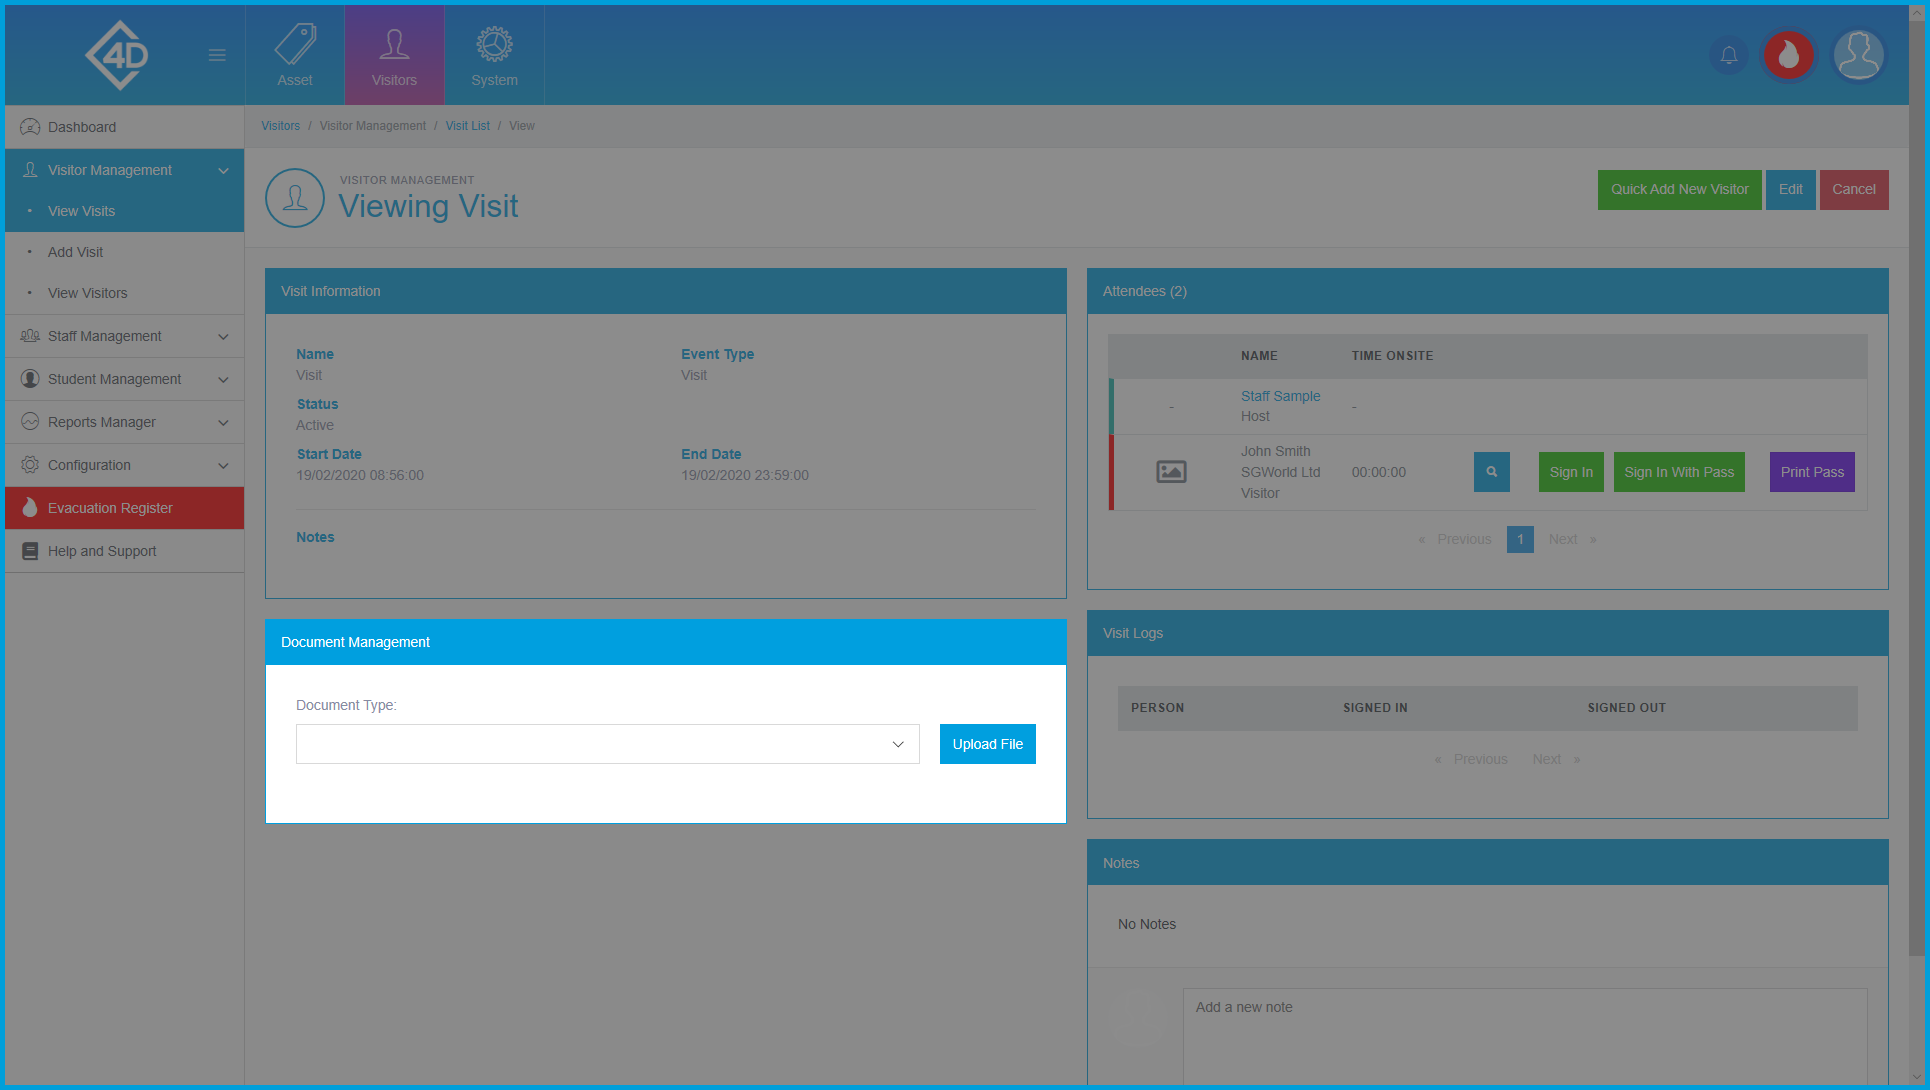
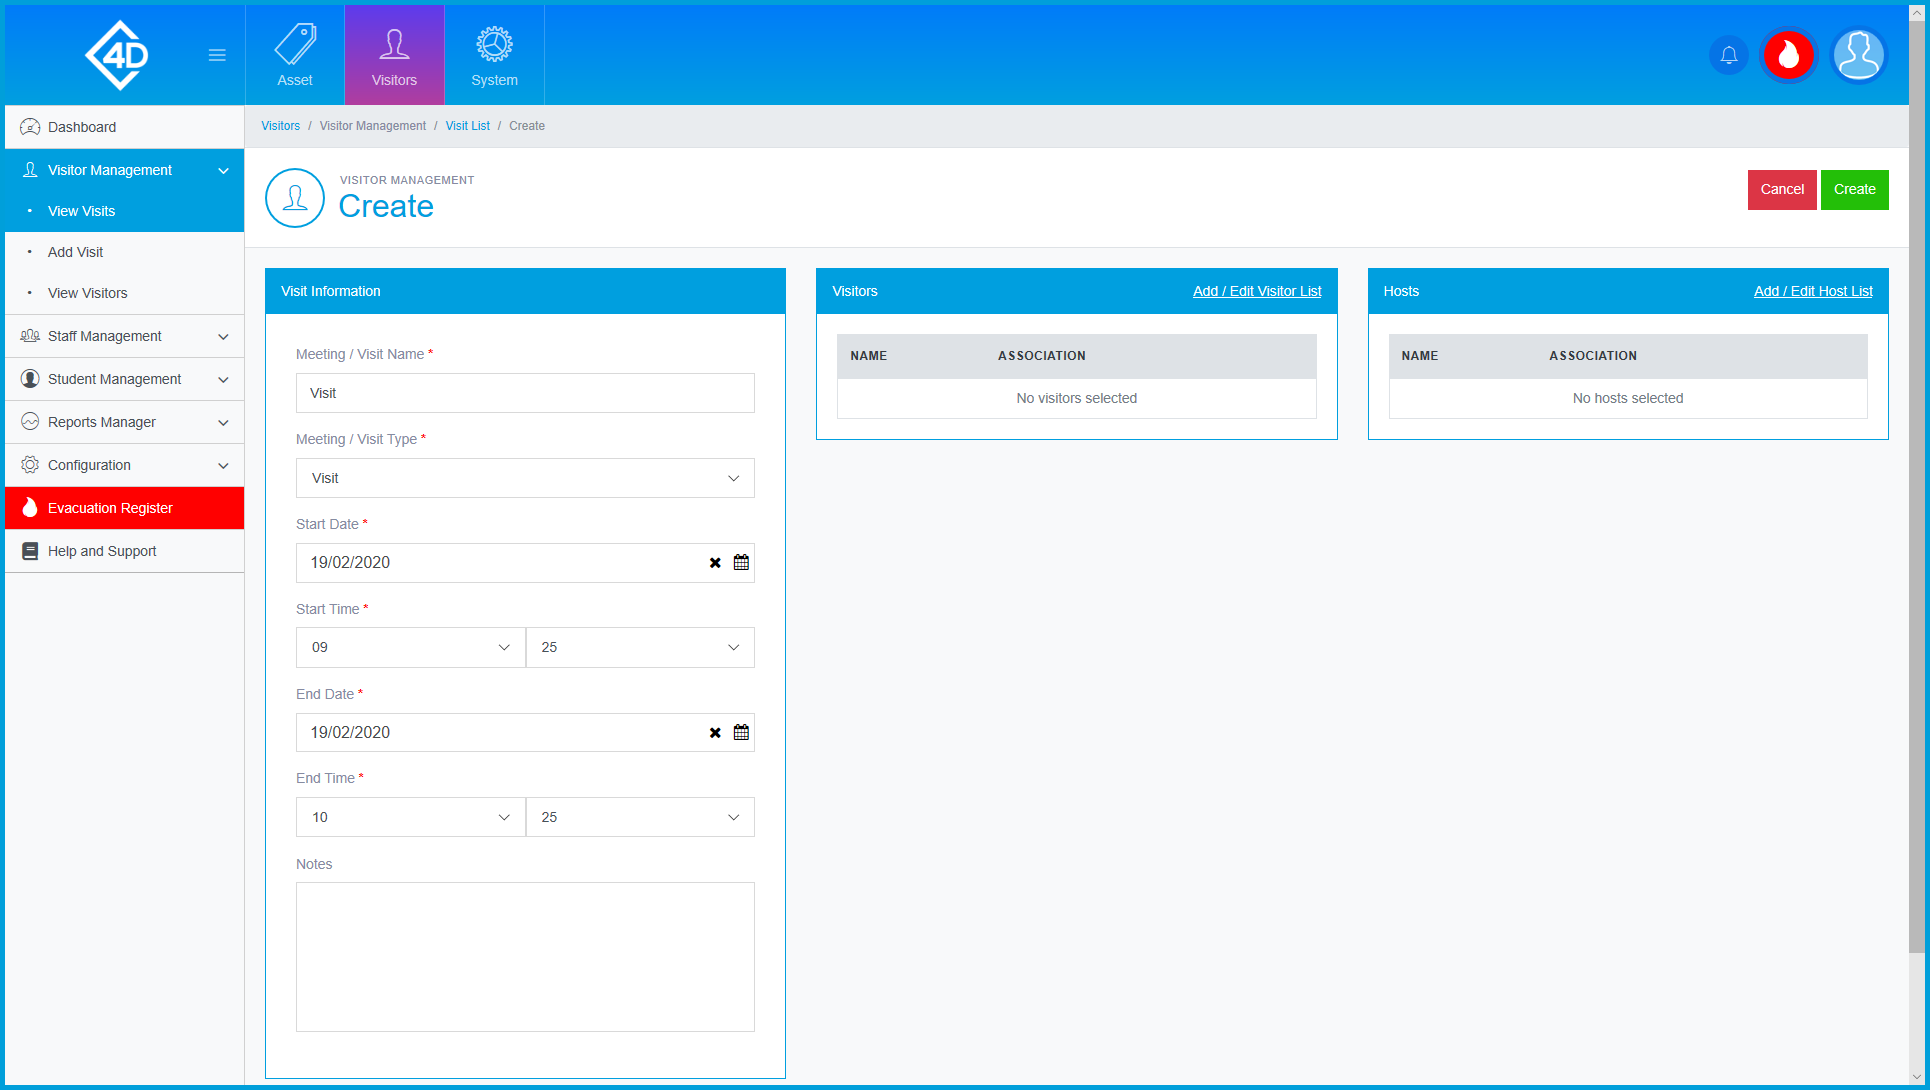
To access a Meeting / Visit simply click on its name in the “Event” column, you will then be taken to the following page.
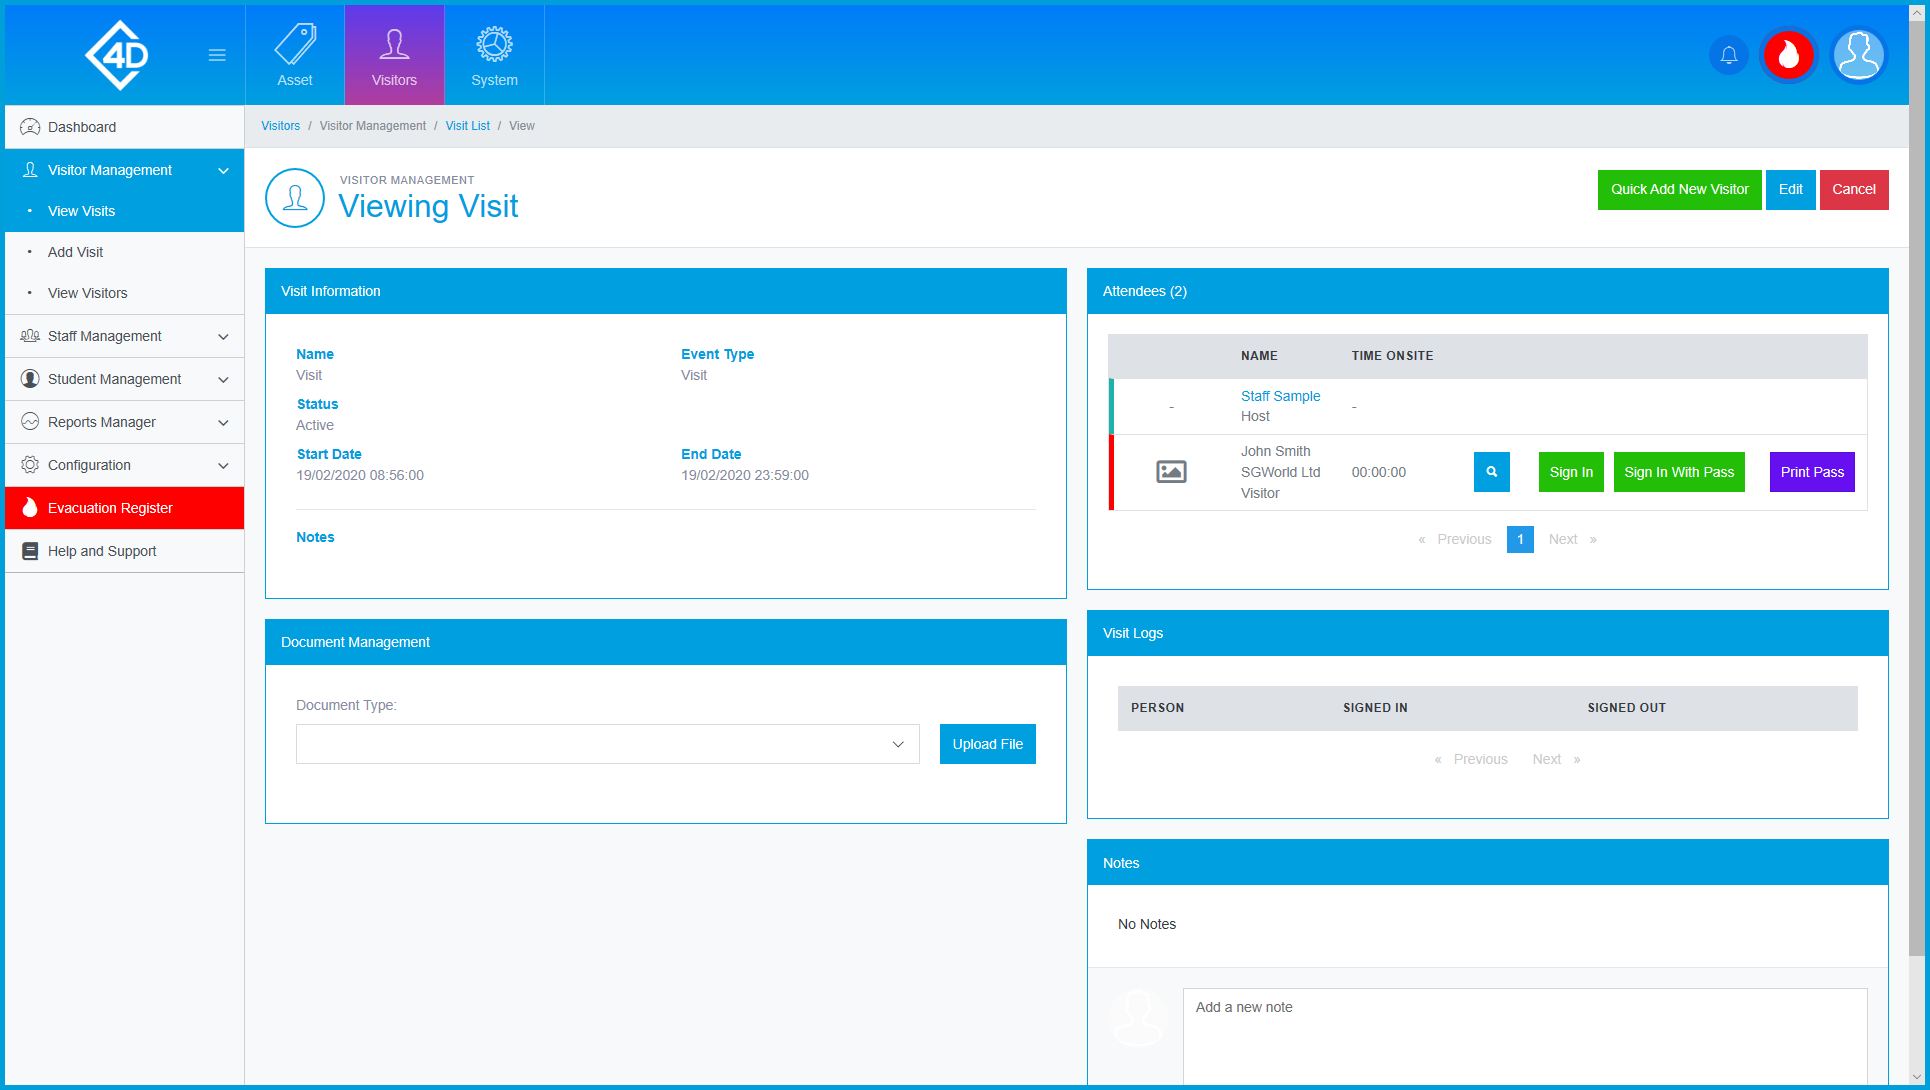
The “Visit Information” section shows the Visit’s details.
This includes the Name, Event Type, Status, Start Date, End Date and Notes.
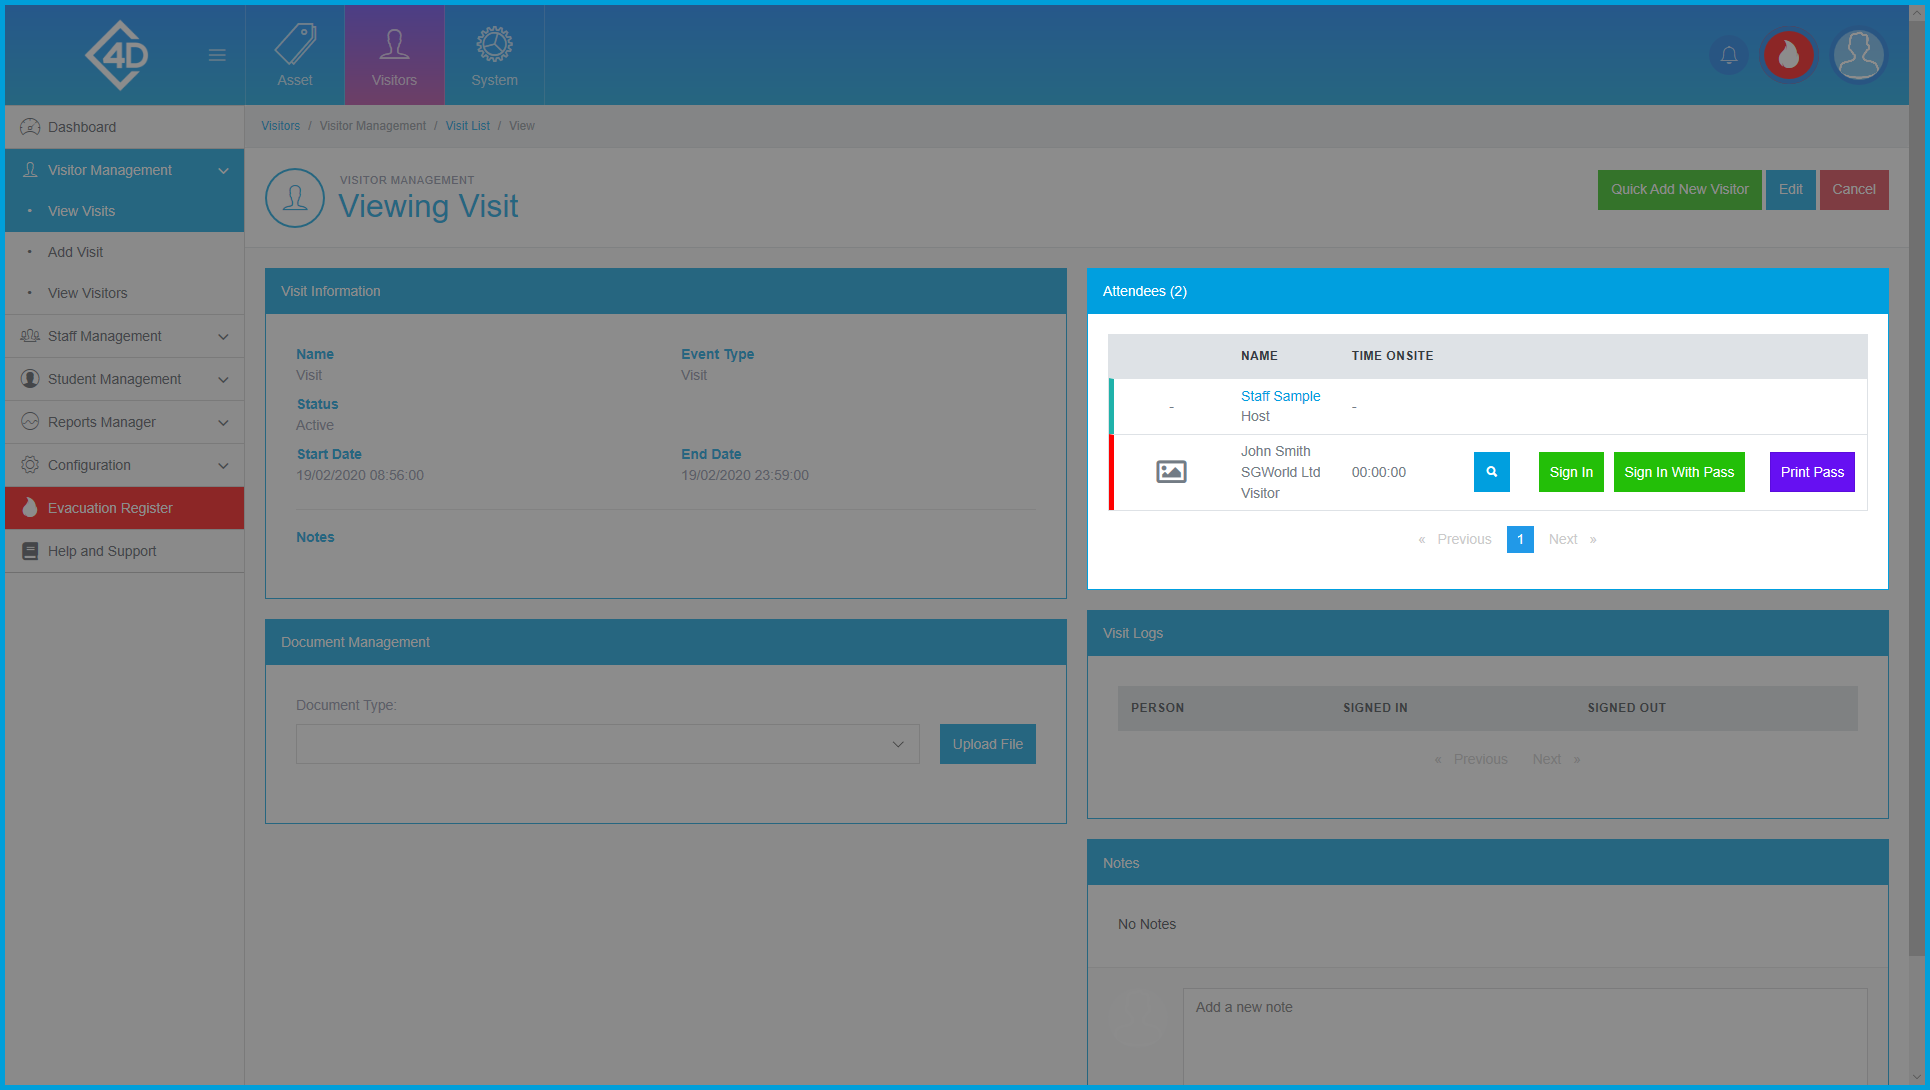
The “Attendees” section provides you with a list of every visitor / host that is associated with the Visit.
Listed is the Name, Company and Type of Visitor, you can also see how long the visitor has been on-site for.
You can directly manage the visitor from this screen by using the “Sign In/Out”, “Sign In With Pass” and “Print Pass” buttons next to a Visitor.
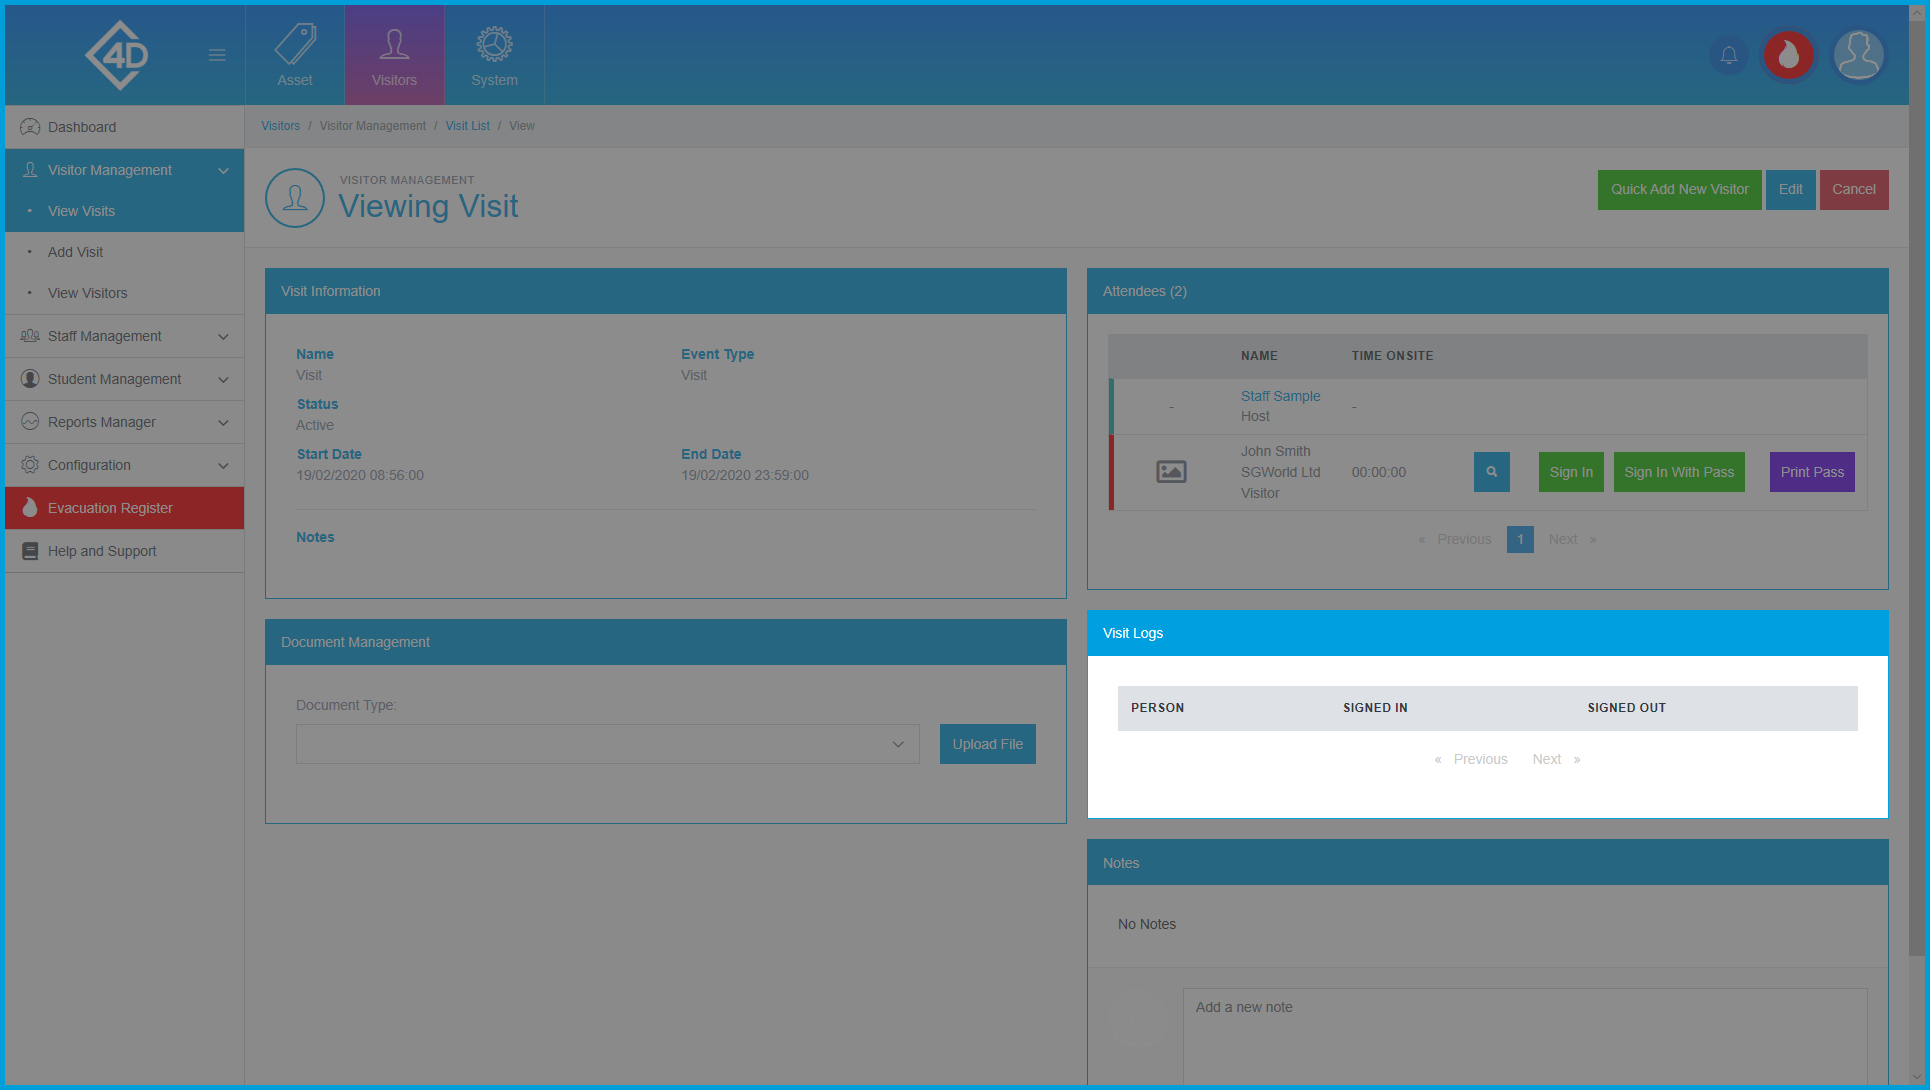
The “Visit Logs” section shows a log of when a Visitor signed in/out.
The “Notes” section allows you to add any additional information to a “Visit” if you wish.
To do so click the “Add a new note” field, you can then type in any information.
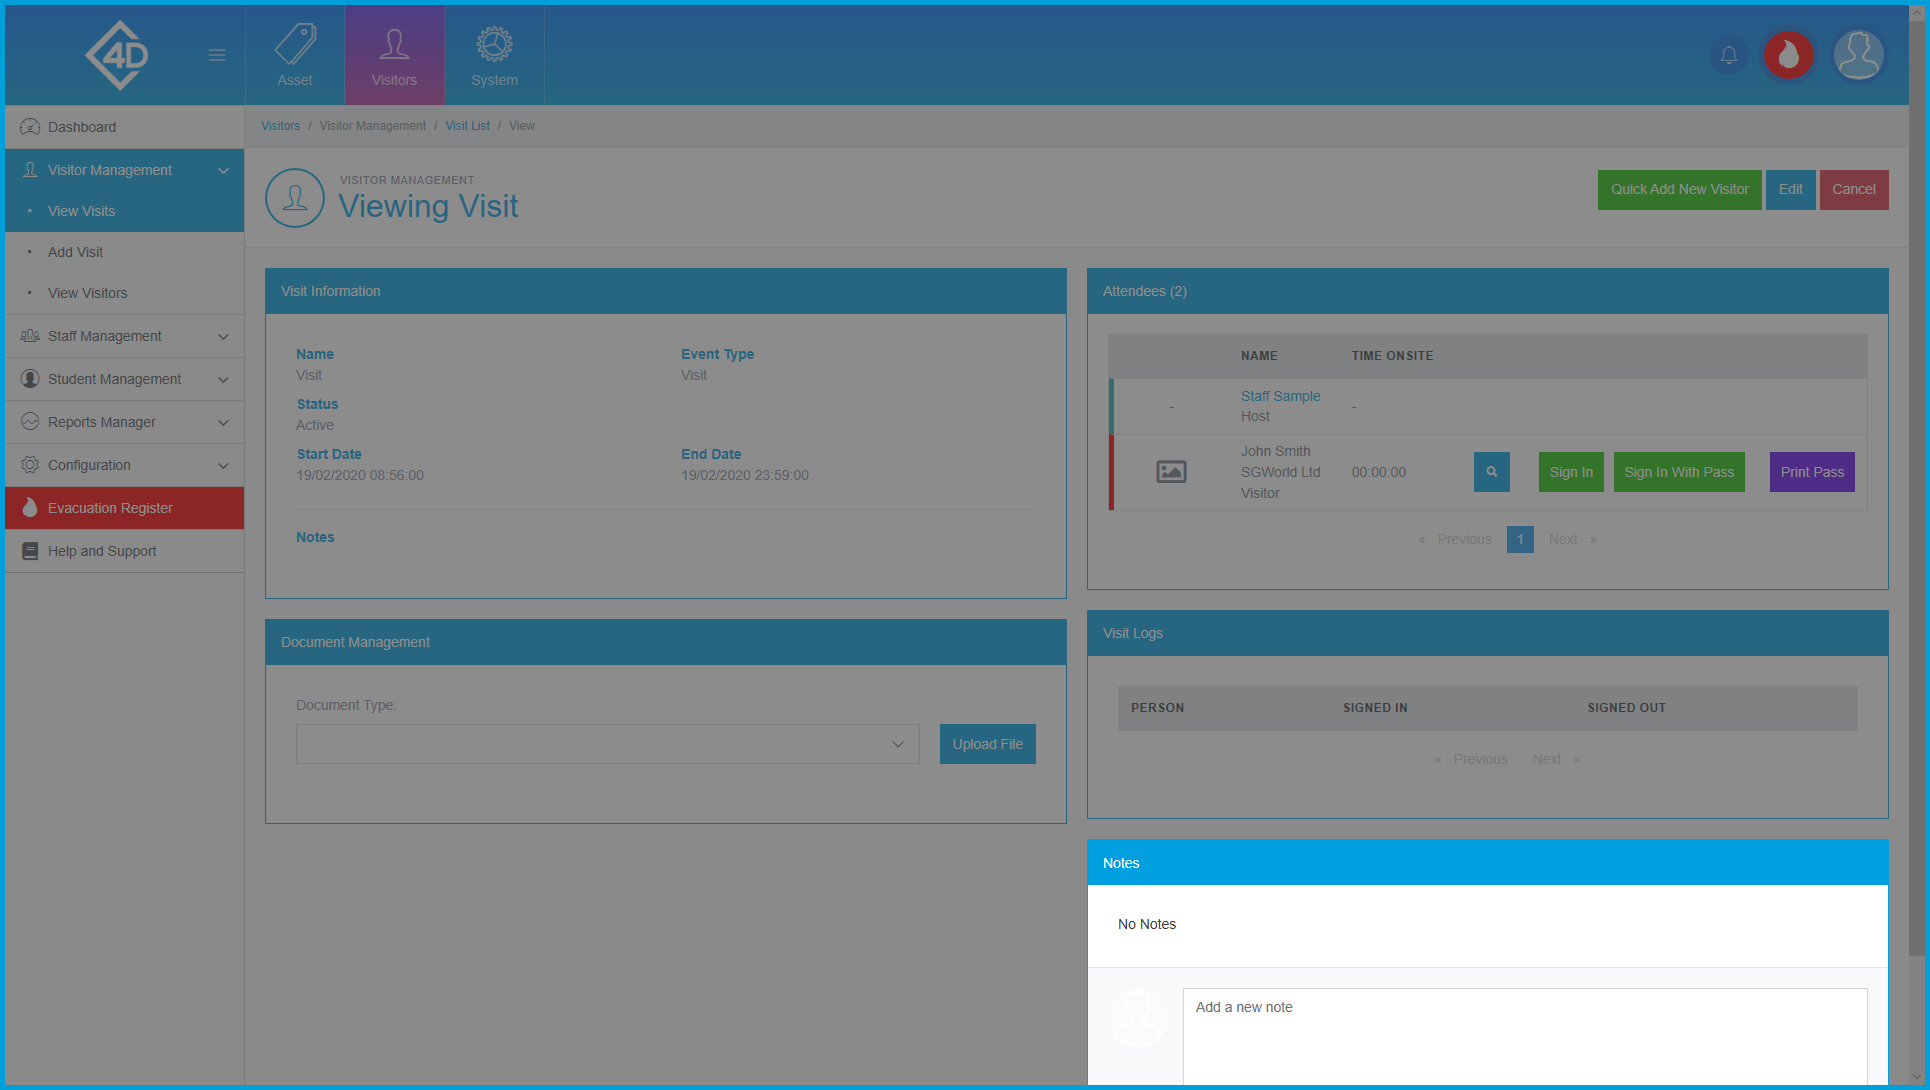
The “Document Management” section allows you to upload any relevant documents to the “Visit”.
To do so first click the dropdown menu, you can then select an existing document type, or you can add a new one.
When adding a new document type you will be asked to set a name, you will also be asked to set the status.
Once you are happy with the type, click the “Upload File” button, you will then be prompted to browse for a local file to upload.